Savant natively uses models in the NVIDIA TensorRT format, optimized for a particular hardware platform. However, users do not need to convert models manually; we encourage them to use the ONNX format, which allows Savant to build TensorRT engines internally.
Once built, the models are cached and loaded quickly unless the cache is moved to a GPU of a different GPU family (e.g., Turing to Ampere) or the batch size changes, which causes Nvinfer, used internally by Savant, to rebuild them. You may also want to rebuild the model for a particular GPU, even within the same family, to ensure it is optimal, because, depending on GPU properties, you can get a better-optimized model for that GPU, especially if you allow TensorRT to use more memory. It’s worth trying if you care about performance maximization. In this manual, we walk through exporting an Ultralytics model to the ONNX format for use in Savant.
Ultralytics is a popular model vendor; even though they require licensing, they are the backbone of many computer vision systems and are loved by ML developers.
To prepare the model, you need to conduct three steps:
- Install the Ultralytics framework.
- Export the model to ONNX.
- Prepare model archive.
- Upload the archive to an HTTP/FTP location.
- Use the model.
Installing Ultralytics framework
Ultralytics is a Python framework with many dependencies, so it is best installed in a virtual environment. Let us create the environment and activate it:
python -m venv ultralytics_venvAnd activate it:
. ultralytics_venv/bin/activateNow, it is time to install the framework:
pip install ultralyticsThe installation takes a while and requires about 8 GB of disk space.
Export the model to ONNX
ONNX is a popular model format that has become a de facto standard for portable model distribution. Ultralytics provides command-line utilities for exporting models to ONNX. You can read the official guide for details. When you export the model, it is essential to instruct the export utility to support dynamic batch size and width/height, since YOLO-style models can operate with variable width and height.
In this manual, we will export yolo11m-seg.pt. However, the routine is the same for other models.
yolo export model=yolo11m-seg.pt format=onnx opset=17 dynamic=True imgsz=640Where,
dynamicstands for the dynamic batch size;opsetstands for ONNX supported operation set (recommended by Ultralytics);imgszdefines the default input size 640×640 but does not restrict the user from using other input sizes (including varying width-to-height ratios).
The operation must end up as follows:
ONNX: starting export with onnx 1.20.0 opset 17...
ONNX: slimming with onnxslim 0.1.80...
ONNX: export success ✅ 10.7s, saved as 'yolo11m-seg.onnx' (86.0 MB)

Export complete (11.7s)
Results saved to /mnt/development/dev/savant/Savant
Predict:         yolo predict task=segment model=yolo11m-seg.onnx imgsz=640
Validate:        yolo val task=segment model=yolo11m-seg.onnx imgsz=640 data=/ultralytics/ultralytics/cfg/datasets/coco.yaml
Visualize:       https://netron.app
💡 Learn more at https://docs.ultralytics.com/modes/export
VS Code: view Ultralytics VS Code Extension ⚡ at https://docs.ultralytics.com/integrations/vscode
You must be able to find the ONNX model file in the filesystem:
ls -l yolo11m-seg.onnx
-rw-rw-r-- 1 user user 90160305 Dec 19 14:14 yolo11m-seg.onnx
Let us check the model in netron. We are interested in the input and output layers:
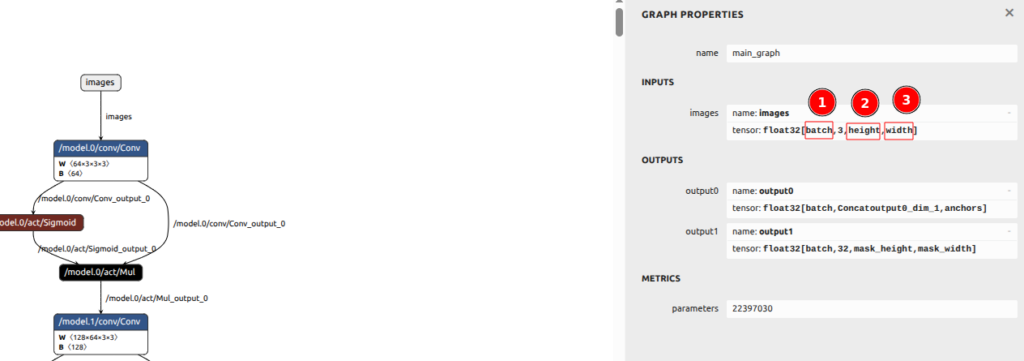
What we can see:
- The model is dynamic: batch (1) is not a constant but a parameter.
- The height is a parameter.
- The width is also a parameter.
Output layers also have a dynamic batch size as expected. So far, so good.
Prepare the model archive
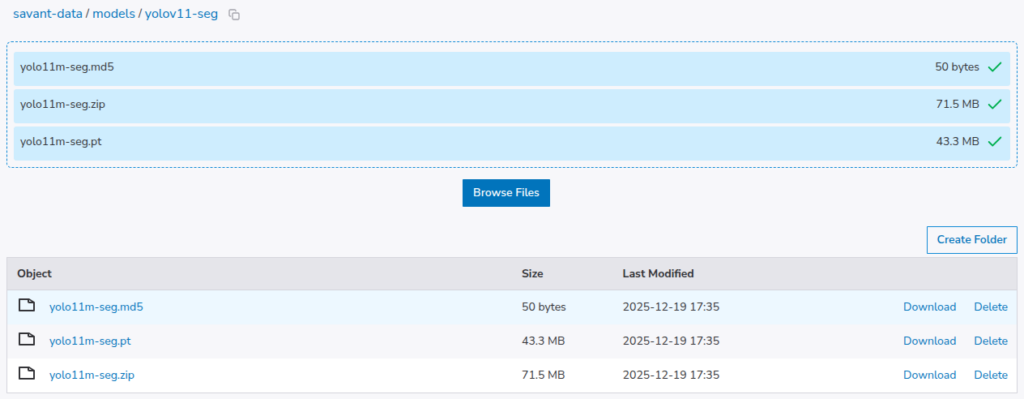
When the models are distributed remotely, prepare a ZIP archive containing the model’s ONNX file and any required auxiliary files, along with a checksum file. In our case, we only need the ONNX zip and its MD5 checksum. Let us generate the MD5 checksum file.
Let us create a zip file:
zip yolo11m-seg.zip yolo11m-seg.onnx
  adding: yolo11m-seg.onnx (deflated 17%)
Let us generate the ZIP file MD5 checksum:
md5sum yolo11m-seg.zip | tee yolo11m-seg.md5
a1dba6c915dc61f904e1a41cce7596f9  yolo11m-seg.zip
Now is the time to upload the files to a remote storage service. This step is not demonstrated in the guide because it depends on your remote.
The PT file is not needed but has been added for observability and traceability.
Let us use the model in the pipeline. In my case, I’m planning to update our yolov8-seg demo to use yolo11m-seg.
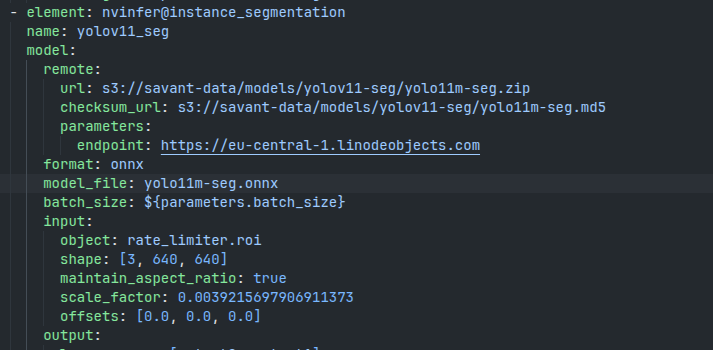
If you encounter a naming issue and the model cannot be found locally, remove the model files from the cached downloads and repeat.
Summary
This tutorial provides simple steps to prepare Ultralytics models for use with Savant. It is important to export the model with a dynamic batch size to make sure it functions properly when the batch size changes.
Do not hesitate to contact us on Discord for more information about Savant and to progress quickly with community help.